A simple webblog with Laravel and CRUD
Knowfox is based on Laravel, the PHP framework for artesans. Aside from being a system for personal knowledge management, Knowfox is also an opensource system that can be used as a toolbox for your own projects. In this article, I will explain how to use Laravel, some opensource components and the Knowfox CRUD package to setup a simple weblog.
The Basic Installation
Before getting started, you might need to install Composer, the PHP package manager, first. Just follow the instructions on its website.
Then set up your project by installing Laravel. At the time of writing, the following command installs Laravel v5.6.33:
composer create-project laravel/laravel simple-weblog
cd simple-weblog
If you do not have a local webserver, you might want to set up Laravel Valet which is super handy. Or, just start PHP's built-in webserver via the following command line:
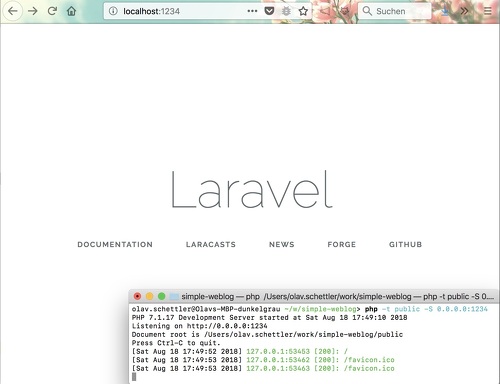
php artisan serve
Then, open http://localhost:8000 in your favorite browser.
So, Laravel is installed successfully. However, you still need to configure a database. For a personal weblog, SQlite will be sufficient. You may prefer MySQL to be able to access the database remotely, but let's stick with SQlite for the sake of this tutorial. To create it, run the sqlite command line tool as:
~/w/simple-weblog> sqlite3 database/database.sqlite
SQLite version 3.19.3 2017-06-27 16:48:08
Enter ".help" for usage hints.
sqlite> .dump
PRAGMA foreign_keys=OFF;
BEGIN TRANSACTION;
COMMIT;
sqlite> ^D
You might need to install sqlite3 before using it, e.g. with brew install sqlite3. You can also use SQlite Browser to manipulate your database, if you prefer a visual tool.
You need to tell Laravel about your database. To do so, edit the file .env and add the line
DB_CONNECTION=sqlite
Delete all other lines with DB_... that the file may contain.
Now, create the Laravel Auth scaffolding and run the migrations to create the database tables:
~/w/simple-weblog> php artisan make:auth
Authentication scaffolding generated successfully.
~/w/simple-weblog> php artisan migrate
Migration table created successfully.
Migrating: 2014_10_12_000000_create_users_table
Migrated:  2014_10_12_000000_create_users_table
Migrating: 2014_10_12_100000_create_password_resets_table
Migrated:  2014_10_12_100000_create_password_resets_table
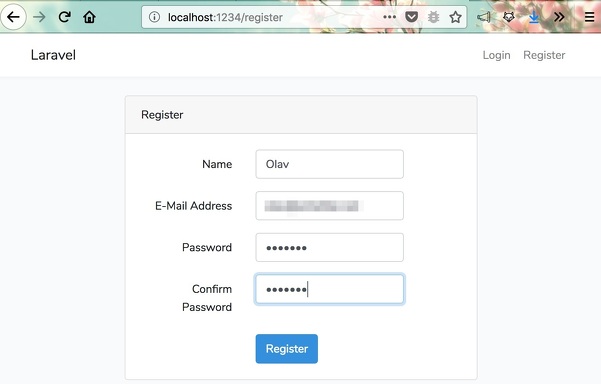
Now, when you invoke your website again, you get links to the registration and login forms. Click on Register and register yourself an account:
This concludes the Laravel installation, complete with authentication and Bootstrap 4 templates.
The Posts
Now that the basic Laravel installation works, we proceed by defining the data model for our Weblog:
~/w/simple-weblog> php artisan make:model --all Post
Model created successfully.
Factory created successfully.
Created Migration: 2018_08_18_194515_create_posts_table
Controller created successfully.
As you can see, the --all parameter does a whole lot for you: It creates the model alright, but it also creates a factory, a migration, and a controller. We come to all of them in turn.
Before we continue, however, we really need a text editor. I really would want to recommend Atom by Github, but as both of them now belong to Microsoft and I had more luck setting up debuggers with it, I'd say you will be more happy with Visual Studio Code (Did I really recommend a Microsoft tool there? Sigh!)
In your editor of choice, open the migration file you've just created from the database/migrations folder (It will be called DATE_TIME_ create_posts_table.php) and add the following lines between $table->increments('id'); and $table->timestamps();:
$table->string('title');
$table->text('summary');
$table->longtext('body');
$table->datetime('published_at')
This is the bare minimum of fields for our weblog. We make no attempt at multi-user permissions, so there is no owner field.
Save the file, then apply the migration with
~/w/simple-weblog> php artisan migrate
Migrating: 2018_08_18_194515_create_posts_table
Migrated:  2018_08_18_194515_create_posts_table
To be able to see some blog entries, we create a bunch using a seeder and the factory we created earlier. First, open the file `database/factories/PostFactory.php´ and extend the return statement as follows:
return [
	'title' => $faker->sentence,
	'summary' => $faker->paragraph,
	'body' => join("\n\n", $faker->paragraphs(4)),
];
To keep things simple, we insert a call to our factory in Laravel's default Database Seeder. Please read the documentation on how to split seeders in their own classes for bigger projects. Insert the following code into the run method of file database/seeds/DatabaseSeeder.php:
factory(App\Post::class, 50)->create();
This will create 50 random posts. Time to display them.
A Frontend
To make things easy for us, we use largely unstyled blog templates, based on Bootstrap 4, released by Blackrock Digital LLC under an MIT license. You can download the complete version from the Github repository for this article.
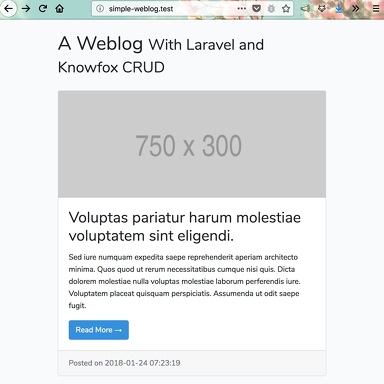
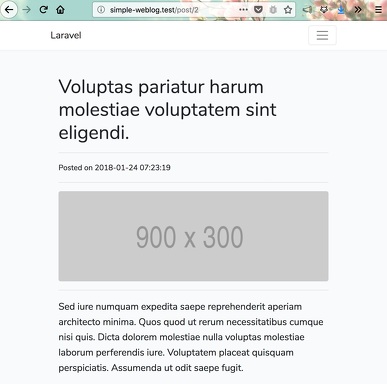
The styled frontend with our seeded content already looks promissing:
An Admin Interface
Now that we have frontend templates and a lot of randomly generated test posts, we want to be able to create new posts and edit existing ones. We use the package knowfox/crud to help us create the forms and controller actions. First, install the package:
~/w/simple-weblog> composer require knowfox/crud:dev-master

./composer.json has been updated
Loading composer repositories with package information
Updating dependencies (including require-dev)
Package operations: 2 installs, 0 updates, 0 removals
  - Installing composer/installers (v1.5.0): Downloading (100%)
  - Installing knowfox/crud (dev-master 4109531): Cloning 4109531937 from cache
Writing lock file
Generating optimized autoload files
> Illuminate\Foundation\ComposerScripts::postAutoloadDump
> php artisan package:discover
Discovered Package: fideloper/proxy
Discovered Package: laravel/tinker
Discovered Package: nunomaduro/collision
Discovered Package: knowfox/crud
Package manifest generated successfully.
As opposed to complete admin generators, the Knowfox CRUD package requires some orchestration to make it work. This makes it more flexible while keeping it simple.
The package comes with its own settings table. Install it by running migrations: php artisan migrate.
Now, publish the configuration to be able to edit it:
~/w/simple-weblog> php artisan vendor:publish --tag=config
Copied File [/vendor/knowfox/crud/crud.php] To [/config/crud.php]
Publishing complete.
The CRUD package needs to know a minimum of things about your model to function. Edit the file config/crud.php and make the return stagement look like this:
return [
    'post' => [
        'model' => \App\Post::class,
        'order_by' => 'published_at|desc',
        'entity_name' => 'post',
        'entity_title' => [' Post', 'Posts'], // singular, plural
        'columns' => [
            'id' => 'ID',
            'title' => 'Title',
        ],
    ],
];
This prepares the admin list for our posts. It tells CRUD the name of our model class, the routing name and title of it, and the sort order of the index table. It also lists the columns to be shown on the overview page (ID and Title).
Next, we need some routes for our admin screens. Make your route file look like this:
<?php
Auth::routes();

Route::middleware('auth')
    ->prefix('admin')
    ->group(function () {

    Route::get('/', function () {
        return redirect()->route('post.index');
    });

    Route::resource('post', 'PostController', [
        'except' => ['show']
    ]);
});

Route::get('/', 'PostController@home')->name('home');
Route::get('/{post}', 'PostController@show')->name('post.show');
Here, our two frontend routes at the bottom are still accessible by anonymous users. Our admin routes, on the other hand, are protected by Laravel's authentication system.
Finally, our PostController needs an index method to serve the admin list. Add the following elements to your file app/Http/Controllers/PostController.php:
    protected $crud;

    /**
     * Connection with the CRUD configuration
     */
    public function __construct(Crud $crud)
    {
        $this->crud = $crud;
        $this->crud->setup('crud.post');
    }

    /**
     * Frontend listing of posts.
     */
    public function home()
    {
        $posts = Post::whereNotNull('published_at')
            ->orderBy('updated_at')->paginate();

        return view('post.home', [
            'post' => $posts,
        ]);
    }

    /**
     * Frontend view of post.
     */
    public function show(Post $post)
    {
        return view('post.show', [
            'post' => $post,
        ]);
    }

    /**
     * Admin listing of posts.
     */
    public function index(Request $request)
    {
        return $this->crud->index($request);
    }
In addition to the two frontend actions home and show, there is an ìndex action which serves the admin list of posts.
The view for the admin list in file views/post/index.blade.php contains only one line:
Extends('crud::index')
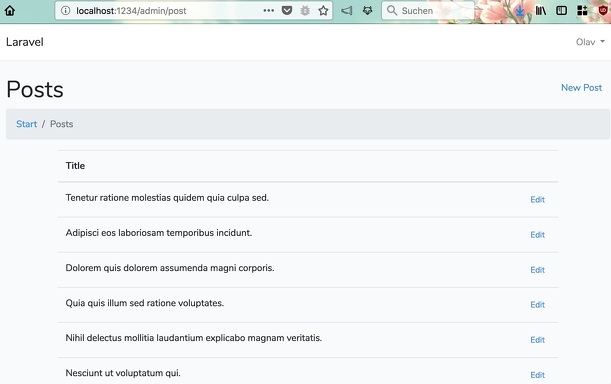
When we now start our PHP webserver (php artisan serve) and go to http://localhost:8000/admin , we are greeted with a list of posts:
When you click on the edit links, you see only a blank page. We will fix this in the next section.
Making Posts Editable
Now that we have the basic infrastructure for the CRUD package in place, we can proceed to create an edit form for our posts. Laravel has prepared four messages for showing forms and receiving the entered data. First, we add the necessary logic to show the forms:
    /**
     * Show the form for creating a new post.
     */
    public function create()
    {
        return $this->crud->create();
    }

    /**
     * Show the form for editing the specified post.
     */
    public function edit(Post $post)
    {
        return $this->crud->edit($post);
    }
Next, created the required view files:
// file resources/views/post/create.blade.php
Extends('crud::create')

// file resources/views/post/edit.blade.php
Extends('crud::edit')
Finally, extend the configuration in config/crud.php with a description of the editable fields:
'fields' => [
		'title' => [
				'label' => 'Title',
				'type' => 'text',
				'cols' => 8,
		],
		'published_at' => [
				'label' => 'Published',
				'type' => 'date',
				'cols' => 4,
		],
		'summary' => [
				'label' => 'Summary',
				'type' => 'textarea',
		],
		'body' => [
				'label' => 'Body',
				'type' => 'markdown',
		],
]
Add the following lines to your Javascript and Styles files to make the Markdown editor work:
// file resources/assets/js/app.js
window.InscrybMDE = require('inscrybmde/dist/inscrybmde.min');

// file resources/assets/sass/app.scss
Import "~inscrybmde/dist/inscrybmde.min";
Then install and build the required frontend assets:
~/w/simple-weblog> npm install --save-dev inscrybmde cross-env
~/w/simple-weblog> npm run dev
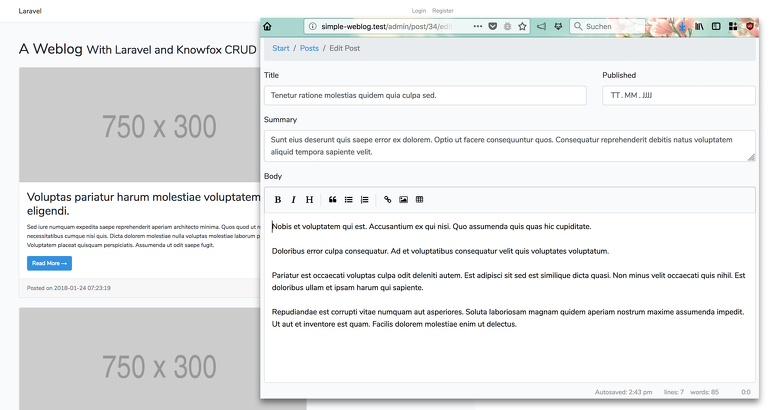
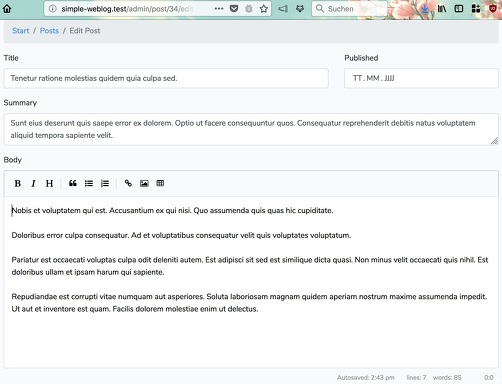
After all this hassle, you are greeted with a nice edit form:
But we are still a few edits away from a complete solution: The forms show alright, but we are still missing the actions to receive data. We will add these in a minute. Before that, however, we need another class to validate post data submissions. Create it with our trusted command line tool:
~/w/simple-weblog> php artisan make:request PostRequest
Request created successfully.
Then, edit the created file app/Http/Requests/PostRequest.php and add the following:
    /**
     * Determine if the user is authorized to make this request.
     *
     * Return bool
     */
    public function authorize()
    {
        return Auth::check();
    }

    /**
     * Get the validation rules that apply to the request.
     *
     * Return array
     */
    public function rules()
    {
        return [
            'title' => 'required',
            'summary' => 'required',
        ];
    }
Also, add the line use Illuminate\Support\Facades\Auth; to the top of the file.
Now, open the PostController again and add the following methods:
    /**
     * Save the form data creating a new post.
     */
    public function store(PostRequest $request)
    {
        list($post, $response) = $this->crud->store($request);
        return $response;
    }

    /**
     * Save the form data editing a post.
     */
    public function update(PostRequest $request, Post $post)
    {
        return $this->crud->update($request, $post);
    }

    /**
     * Delete a post.
     */
    public function destroy(Post $post)
    {
        return $this->crud->destroy($post);
    }
Also, add the line use App\Http\Requests\PostRequest; to the top of the file.
The model in app/Post.php needs some information about our form fields as well. In the body of the class, add
    protected $fillable = ['title', 'summary', 'body', 'published_at'];
    protected $dates = [
        'created_at',
        'updated_at',
        'published_at',
    ];
Finally, add the following line to config/crud.php to enable delete links in the post overview:
'deletes' => true,
This completes the admin interface for our weblog.
You can download the complete example code in the Github repository.
Of course, a complete blog needs even more functions:
- Pictures
- Tags
- Categories
- Comments
- RSS feeds
All of this is not difficult to add. However, a tutorial needs to wait until another episode.
I am very interested in your feedback or comments. You can add them on Github,using issues.
Have fun! -- Olav